Body Repair
Body Repair tracks collision work from the first damage report to the return of the vehicle.
For DSP teams: Start with Body Repair for DSPs. It walks through your decisions, explains the scope and quotes, and covers pickup, added work, report approval, payment, return, and problems after repair.
For body shops: Use the vendor sections below for quoting, inspections, repair evidence, and handoff. New staff can start with New Vendor Training.
Body Shops: Find Today’s Work
Section titled “Body Shops: Find Today’s Work”On your Body Repair page, start with Pickups & drop-offs. Pick up and Drop off list vehicles due today and overdue handoffs, with late indicators. Select a tile to narrow the queue, or select a vehicle to open its request. Selecting the active tile again or clearing its filter restores the wider queue.
Use the Customer filter to focus on one DSP. If that filter hides vehicles counted in a due tile, choose All customers to see the whole group. A customer code helps distinguish similar fleet numbers. Check the request itself before traveling: a vehicle can be due for return while still waiting on payment or another required step.
The work-status totals summarize the selected customer and stages. Quote-stage money reflects your shop’s quote, not other shops’ bids, and stage amounts are not bank payouts. Pending Customer Payment and Pending Dropoff describe different next steps. If you have not quoted a request yet, another shop’s quote does not make it your quoted job.
Use the queue filters for active, completed, or canceled work, and Show more when offered. Open the order’s date strip for planned collection, actual collection, expected return, and actual return.
Understand the Main Stages
Section titled “Understand the Main Stages”The request moves through these stages:
- The customer creates the repair request.
- Body shops review the repair scope and submit quotes.
- The customer selects a quote.
- The shop proposes a pickup time.
- The customer confirms the pickup details.
- The shop follows the pickup inspection steps shown and records taking custody (Check Out) when allowed.
- The shop repairs and inspects the vehicle.
- The shop sends a finished report.
- The customer accepts or rejects the finished report.
- The customer pays for the approved repair.
- The shop returns the vehicle and closes custody (Check In).
Open the request and read Action Required to see who must act next.
Customer: Create a Repair Request
Section titled “Customer: Create a Repair Request”Before you start, have this information ready:
- The vehicle and its current location.
- A clear description of the damage.
- Photos of the damaged areas.
- The completed PAVE Condition Report, as a PDF or report address.
- The repair quality that you need.
- Any open body defects that belong in the repair.
- A contact person for pickup and return.
To create the request:
- Select Body Repair.
- Select New Request.
- Select the vehicle.
- Upload the completed PAVE report PDF or paste its report address. Supply separate unused inspection links when requested.
- Wait for Nova Fora to show the vehicle and damage information.
- Confirm that the vehicle information is correct.
- Select the damage that the shop must repair.
- Import related body defects when they apply to this repair.
- Add notes and photos for damage that is not in the inspection report.
- Select the required repair quality.
- Review the eligible-shop preview and choose the request option shown. Select an actual assigned Station if the form requires one. A preview is not a quote selection; you choose a quote later.
- Review the full repair scope.
- Select Submit.
Expected result: The request appears in Body Repair and is ready for shop review.
Do not continue if the inspection report shows a different vehicle.
Customer: Correct the Repair Scope
Section titled “Customer: Correct the Repair Scope”You can correct the scope before a shop submits the first quote.
- Open the request.
- Find Repair Scope.
- Select Edit Request.
- Correct the damage, photos, notes, or required repair quality.
- Review the changes.
- Select Save.
Expected result: Shops that already opened the request can see that the scope changed.
After a quote is submitted, use Repair Comments to ask the shop for a change. Do not create a second request for the same repair.
Vendor: Review New Requests
Section titled “Vendor: Review New Requests”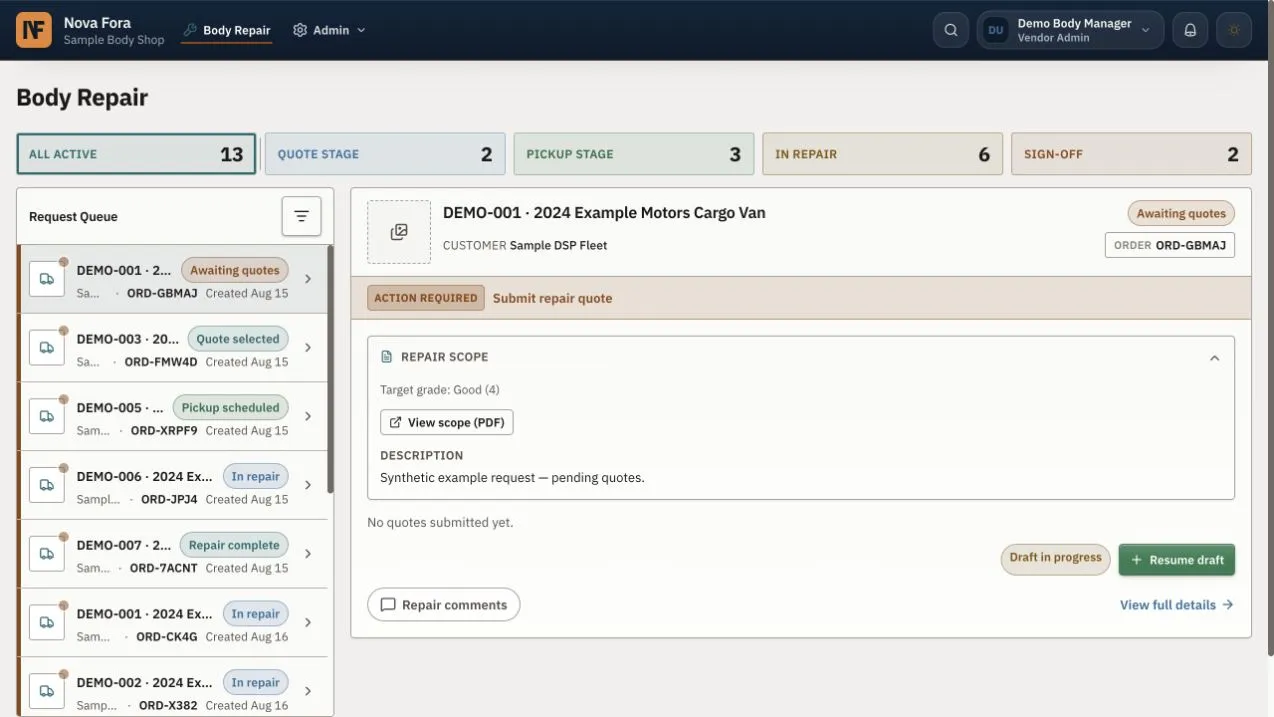
Before you quote, confirm that your shop can do the work and meet the requested result.
- Select Body Repair.
- Select Quote Stage.
- Open a request that needs action.
- Review the vehicle and customer.
- Read the damage description and notes.
- Review every photo.
- Open the inspection report and repair scope.
- Check the requested repair quality.
- Check the requested dates and vehicle location.
- Open Repair Comments if you need an answer from the customer.
- Start a quote only when the scope is clear.
Opening a request can mark it as seen. Review all new information before you leave the page.
Vendor: Use Repair Comments
Section titled “Vendor: Use Repair Comments”Each shop has a private conversation with the customer while quotes are open. Other shops cannot see that conversation.
- Open the request.
- Select Repair Comments.
- Read all unread comments.
- Ask one clear question in each message.
- Add a photo only when it helps explain the question.
- Send the message.
- Return to the request after the customer replies.
After the customer selects a quote, the conversation continues with the selected shop.
Vendor: Create and Submit a Quote
Section titled “Vendor: Create and Submit a Quote”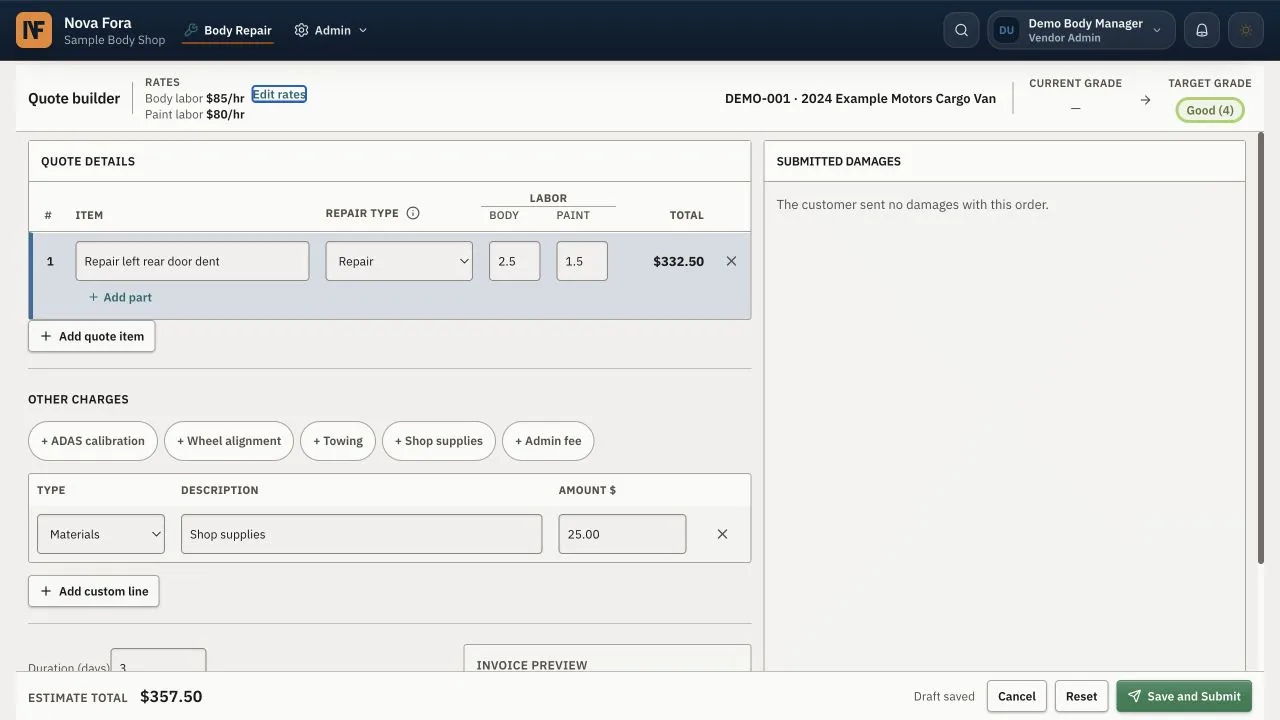
The quote must describe the full repair. Do not use one general line for unrelated work.
- Select Create Quote or Resume Draft.
- Add each repair operation.
- Add the related part and quantity.
- Add body labor hours.
- Add paint labor and materials.
- Add required fees or other charges.
- Add a note when a line needs explanation.
- Enter the repair duration.
- Check the shop rates.
- Check the subtotal, tax, and total.
- Compare the quote with the repair scope.
- Save the draft if the quote is not ready.
- Select Save and Submit when the quote is complete.
Expected result: The customer can review the submitted quote. Your private draft is closed.
If the customer changes the scope, Nova Fora keeps your draft. Review the new scope and confirm it before you submit.
Quote Expiry and Collection Dates
Section titled “Quote Expiry and Collection Dates”Read the quote-validity deadline before selecting or promising work. A lapsed quote can remain visible but cannot be selected until the shop renews or adjusts it. When renewal asks for a new collection date, choose when the van can actually be collected. The collection date is different from the repair duration. Recheck the scope, price, and dates after renewal.
Vendor: Withdraw or Adjust a Quote
Section titled “Vendor: Withdraw or Adjust a Quote”Before selection, you can withdraw an active quote and prepare a replacement.
After selection, use Adjust quote when the price or work must change. Explain the reason and review the repair dates as well as the total. A higher price waits for the customer to approve; a reduction or date-only change applies without that price-approval step.
- Open the selected request.
- Select Adjust Quote.
- Update the affected lines.
- Enter the reason for the change.
- Add supporting information when it is useful.
- Check the new total and duration.
- Submit the adjustment.
Do not start added work that increases the price until the customer approves the adjustment. For pickup damage you can cover at the same total, follow the no-extra-cost process below.
Vendor: Add a Supplement
Section titled “Vendor: Add a Supplement”Use a supplement when the shop finds necessary work that was not in the selected quote.
- Open the request.
- Select the supplement action.
- Describe the newly found damage or required work.
- Add the repair lines, parts, labor, and price.
- Add clear supporting photos.
- Explain why the work was not in the original quote.
- Submit the supplement.
- Wait for the customer decision before you do the added work.
A pending supplement can prevent the shop from completing the repair.
Customer: Compare and Select a Quote
Section titled “Customer: Compare and Select a Quote”- Open the request.
- Review each submitted quote.
- Compare the repair work, parts, price, and duration.
- Read the shop’s notes.
- Ask questions in Repair Comments.
- Select the quote that meets your needs.
- Confirm your selection.
Expected result: The selected shop can propose pickup. Shops that were not selected cannot continue the repair.
Vendor: Propose Pickup
Section titled “Vendor: Propose Pickup”- Open the selected request.
- Select the pickup action.
- Enter the proposed date and time window.
- Enter the pickup location.
- Add contact, key, parking, and access instructions.
- Review the details.
- Send the proposal.
Expected result: The customer can confirm or correct the pickup details.
Customer: Confirm Pickup
Section titled “Customer: Confirm Pickup”Before you confirm, make sure that the vehicle, keys, and inspection links will be ready.
- Open the pickup request.
- Check the date, time, and location.
- Check the contact and access instructions.
- Add the required before-repair and after-repair capture links if they are not already present.
- Correct an unused link if it is wrong.
- Confirm the pickup.
Expected result: The request moves to the pickup stage. The scheduled pickup can also appear on the DSP Home screen when it is near or overdue.
A used inspection link becomes part of the repair record and cannot be replaced.
Vendor: Pick Up the Vehicle (Check Out)
Section titled “Vendor: Pick Up the Vehicle (Check Out)”Complete the pickup inspection steps shown on the request before recording custody. The report can be required to unlock pickup; if it stalls, use only the recovery action Nova Fora offers. Record the handoff when your shop actually takes the vehicle. Check Out means the vendor takes custody from the DSP. Confirm the physical action if your screen uses an older label.
Before you start, have these items ready:
- The correct vehicle and keys.
- The current odometer reading.
- A clear photo that shows the vehicle at pickup.
- The pickup contact information.
To record pickup:
- Open the request.
- Confirm the fleet number, plate, and vehicle description.
- Confirm the pickup location and contact.
- Inspect the visible condition of the vehicle.
- Compare the condition with the request photos.
- Select the pickup or take-custody action.
- Enter the exact odometer reading.
- Add at least one clear odometer photo and any other required pickup evidence.
- Record new damage or a vehicle mismatch before you continue.
- Confirm that the keys were received.
- Submit the pickup.
Expected result: The request shows In Repair or In Shop. Nova Fora records that the shop has the vehicle.
If Nova Fora warns that the mileage is lower than the last reading, check the odometer again. Confirm the lower value only when it is correct. The vehicle’s saved mileage will not move backward.
Do not repair a vehicle that does not match the request. Contact the customer immediately.
Vendor: Review the Before-Repair Inspection
Section titled “Vendor: Review the Before-Repair Inspection”The before-repair inspection report can take time to appear. Follow the pickup inspection step before taking custody when the request requires it; do not bypass a waiting report unless the request offers a recovery action.
- Open the request.
- Check the before-repair inspection status.
- Wait if the status says that the report is being prepared.
- Review the report when it is ready.
- Compare new damage with the original repair scope.
- Tell the customer about damage that is outside the approved scope.
- Request a quote adjustment when the repair price or work must change.
Do not treat a report delay as approval to change the repair scope.
Read a Pickup Finding
Section titled “Read a Pickup Finding”The pickup inspection can find damage that was not in the customer’s original report. Read the finding and compare it with the approved scope. If the requested repair quality is still achievable, the additional damage can be informational. If the promised quality is at risk, the shop must answer the finding with the appropriate scope or quote update; the customer then reviews it. An inspection result does not approve an extra charge.
Vendor: Cover Pickup Damage at No Extra Cost
Section titled “Vendor: Cover Pickup Damage at No Extra Cost”Open the pickup finding and inspect the new-damage and increased-severity lists. Compare the panels and photos with the agreed scope and the target grade. If the target is unaffected, the finding can be informational.
If more work is needed to reach the target and your shop will cover it without increasing the total, choose Adjust quote, include the needed work and reason, and submit at the same total. The pickup damage is incorporated into the updated repair scope, marked as added after collection. The customer sees that the shop is repairing it at no extra cost; no price-approval request is sent for that same-price change.
If the total must increase, send the revision and wait for customer approval. Check the revised collection and return dates. Once the van has been collected, its actual collection date is fixed; the expected return can still change. An approved extension moves the due-back date used for follow-up.
Open View scope (PDF) after the update and work from that scope, not a saved copy of the original request.
Vendor: Start and Record the Repair
Section titled “Vendor: Start and Record the Repair”- Confirm that the quote and pickup are approved.
- Confirm that the shop has the vehicle.
- Select the action to start the repair when Nova Fora shows it.
- Complete only the approved work.
- Add useful progress notes in Repair Comments.
- Record a delay or blocker as soon as it occurs.
- Submit a quote adjustment before you do extra work.
Vendor: Complete the After-Repair Inspection
Section titled “Vendor: Complete the After-Repair Inspection”Use the after-repair capture link after the approved work is complete.
- Confirm that the vehicle is ready for inspection.
- Open the request.
- Start or open the after-repair inspection.
- Follow the capture instructions.
- Confirm that the inspection uses the correct vehicle.
- Wait for Nova Fora to prepare the report.
- Review the before-and-after comparison.
If the inspection does not reach the requested repair quality, Nova Fora can ask the customer for another capture link. Complete the necessary correction before you send the finished report.
If the requested quality cannot be reached, select Target Unreachable when it is available. Enter a clear customer-facing reason. Do not use this action only to avoid another inspection.
If a scan remains unavailable and Nova Fora shows the stop-waiting action, review the vehicle and request first. Select the action, enter the reason, and follow the next recovery step shown on the request.
Vendor: Prepare the Finished Report
Section titled “Vendor: Prepare the Finished Report”The finished report tells the customer what the shop repaired. Check the agreed damages by panel and read Still to address. Damage outside the agreed scope is shown separately; seeing it in the inspection does not mean it has been approved or paid for.
- Open the request after the repair and inspection are complete.
- Review each item in the repair scope.
- Mark each item as repaired when it is complete.
- Mark an item as not repairable only when necessary.
- Enter a clear reason for an item that was not repaired.
- Add the required photo or note for each item.
- Review the before-and-after inspection results.
- Confirm the final repair total.
- Choose Finalize the repair report when offered, work through the repair items, then Review & send and Confirm & send.
Expected result: The customer can review the finished repair.
If information is missing, Nova Fora identifies the first item that needs attention. Complete that item and send the report again.
Customer: Review the Finished Report
Section titled “Customer: Review the Finished Report”- Open the request.
- Review the finished report.
- Compare the approved scope with the completed work.
- Review the before-and-after inspection results.
- Read the explanation for any item that was not repaired.
- Select the approval option when the report is correct. Approve without paying leaves the invoice outstanding; Approve and pay continues to payment. Review the confirmation and payment method when requested.
- Select Reject when the vehicle needs more work or the report is wrong.
- Enter a clear reason if you reject the report.
A rejection returns the request to the shop. The shop must correct the work or report and send a new finished report.
Customer: Pay for the Repair
Section titled “Customer: Pay for the Repair”After approval, the request shows the payment action when payment is required.
- Open the approved request.
- Select Pay Now.
- Review the repair amount, tax, and other charges.
- Select the payment method.
- Complete the payment instructions.
- Wait for the confirmation page.
- Return to the request and check the payment status.
A bank payment can show as processing before it is fully complete. Follow the status shown on the request. Do not start another payment while one is processing. If a payment fails, read the reason and use the offered retry or method-change action. Where a saved card is offered, check its displayed details and the final amount before confirming. Approval and payment are separate decisions.
Vendor: Return the Vehicle (Check In)
Section titled “Vendor: Return the Vehicle (Check In)”Do not return the vehicle until Nova Fora shows that return is allowed.
Before you start, have these items ready:
- The correct vehicle and keys.
- The final odometer reading.
- A clear return photo.
- The return contact, time, and location.
To record return:
- Open the request.
- Confirm that the finished report is approved.
- Confirm that payment permits vehicle return.
- Confirm the return contact, time, and location.
- Inspect the vehicle condition.
- Confirm that all customer items and keys are present.
- Select the return action.
- Enter the exact final odometer reading.
- Add at least one return photo.
- Record who received the vehicle and keys.
- Submit the return.
Expected result: The custody record closes. The request shows that the vehicle was returned and the repair is complete.
The final mileage must not be lower than the pickup mileage. Check both readings if Nova Fora rejects the value.
Customer: Receive the Vehicle
Section titled “Customer: Receive the Vehicle”- Confirm the vehicle and keys.
- Check the visible condition.
- Compare the vehicle with the finished report.
- Confirm the final mileage.
- Record a problem before the driver or shop representative leaves.
- Confirm receipt when the vehicle is acceptable.
Cancel, Withdraw, or Stop a Repair
Section titled “Cancel, Withdraw, or Stop a Repair”- A customer can cancel a request before the shop takes custody when the cancel action is available.
- A selected shop can withdraw before it takes custody. The shop must give a reason.
- After pickup, use the stop-work action instead of ordinary cancellation. Record the reason and arrange the safe return of the vehicle.
- A canceled request can remain visible while the shop still has the vehicle. Complete the return steps before you treat the job as closed.
- If no eligible shop is available, an authorized user can correct the routing and revive the request or cancel it.
- An authorized customer or support representative can halt an exception and resume it after the problem is corrected.
Report a Warranty Problem
Section titled “Report a Warranty Problem”Use the warranty action when a completed repair has a problem within the allowed warranty period.
- Open the completed Body Repair request.
- Select the warranty action.
- Describe the problem and when it appeared.
- Add clear photos or other supporting information.
- Submit the claim.
- Follow the status shown on the request.
Nova Fora support reviews the claim. If the claim is accepted, the shop records the correction and supporting proof before the claim is closed.
Solve Common Problems
Section titled “Solve Common Problems”The quote cannot be submitted
Section titled “The quote cannot be submitted”Review the current repair scope. Confirm any change to the scope. Complete all required quote lines, rates, dates, and notes.
The pickup cannot be confirmed
Section titled “The pickup cannot be confirmed”Check the pickup details and required inspection links. Replace a link only if Nova Fora shows that it is still available for correction.
Pickup cannot be completed
Section titled “Pickup cannot be completed”Confirm the vehicle, mileage, and required photo. Check whether the pickup was confirmed.
The finished report cannot be sent
Section titled “The finished report cannot be sent”Review every repair item. Add the missing decision, reason, photo, or note. Wait for an after-repair report that is still being prepared.
The vehicle cannot be returned
Section titled “The vehicle cannot be returned”Check the finished-report decision and payment status. Confirm that the final mileage and return photo are present.
The request shows the wrong next action
Section titled “The request shows the wrong next action”Refresh the request. Check for a recent action in another open tab. Contact support if the request still shows an earlier stage.
Read Invoice Mileage
Section titled “Read Invoice Mileage”Invoices retain Mileage In for the pickup reading and Mileage Out for the return reading. These document labels are separate from the custody actions: Check Out opens vendor custody and Check In closes it.
Save the Repair Documents
Section titled “Save the Repair Documents”Use Download documentation when it is available on the order. The download gathers the documents available to your role and the current repair stage. Review the scope, quote, report, invoice, and receipt as applicable. A receipt is dated by the payment. It can be available before return; its closing mileage is filled in after the van comes back. A missing receipt can mean payment is not complete. Share documents only with the people who need them for this repair.
When You Bring Your Own Body Shop
Section titled “When You Bring Your Own Body Shop”DSP Owners can invite their own body shop using Bring Your Own Vendor (BYOV). Enter the shop name, email, and valid mobile number. You can also send the invitation from Admin → organization settings → Shop relationships → Personal body shop. See the invitation steps. A request can be directed to the invited shop while signup is pending; the shop must finish signup to respond. An eligible personal shop does not require an assigned Station to receive the repair.
Follow the order’s stated payment method and release action. An own-shop arrangement can use a different payment path from a network repair; do not assume that paying a platform fee settles the shop’s bill. Agree on the shop payment directly where the order instructs you to do so. Do not apply the email-only mechanical-vendor tracking rules to a Body Repair shop that operates inside Nova Fora.