Body Repair for DSPs
Use Body Repair to get vehicle damage assessed, compare shop quotes, and follow the job until the van is back with your team. This guide follows your side of the repair, including the decisions that need your attention along the way.
For your first repair, work through the request with the person who approves repairs for your DSP. Agree who will choose the quote, answer shop questions, arrange keys, review the finished work, and handle payment. Your account determines which actions you can take; being able to read a request does not mean you can approve it.
Find Your Next Step
Section titled “Find Your Next Step”| Where you are | What to do |
|---|---|
| You have damage to repair | Prepare and submit the request |
| Shops are asking questions or quoting | Review the scope and compare quotes |
| You have selected a shop | Arrange pickup and inspection links |
| The pickup inspection finds more damage | Review the finding and any added cost |
| The van is at the shop | Keep the repair moving |
| The shop says the work is finished | Review the finished report |
| The report is approved | Check and complete payment |
| The van is coming back | Receive the vehicle and keep the documents |
| Plans have changed or something is wrong | Cancellation, delays, and warranty help |
Get Comfortable with the Body Repair Page
Section titled “Get Comfortable with the Body Repair Page”Open Body Repair. The stage groups help you find requests waiting for quotes, pickup, shop work, or sign-off. Choose a request from the list, check its vehicle, and read Action Required before doing anything else.
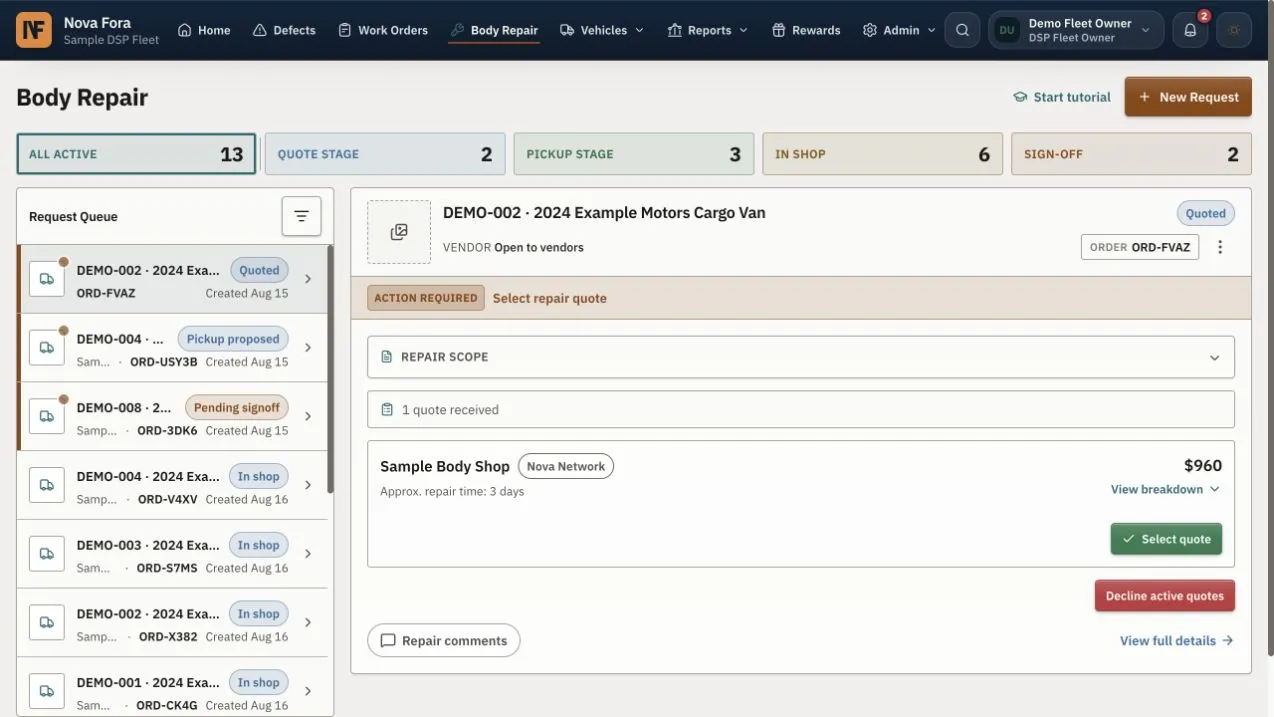
In this earlier sample, the selected request needs a quote decision. The stage totals help you find work; Action Required tells you what this request needs next.
Open Repair Scope to see what you asked the shop to do. Open the quote details to see its charges. Use View full details when you need the full request, including its current action, scope and cost, and record.
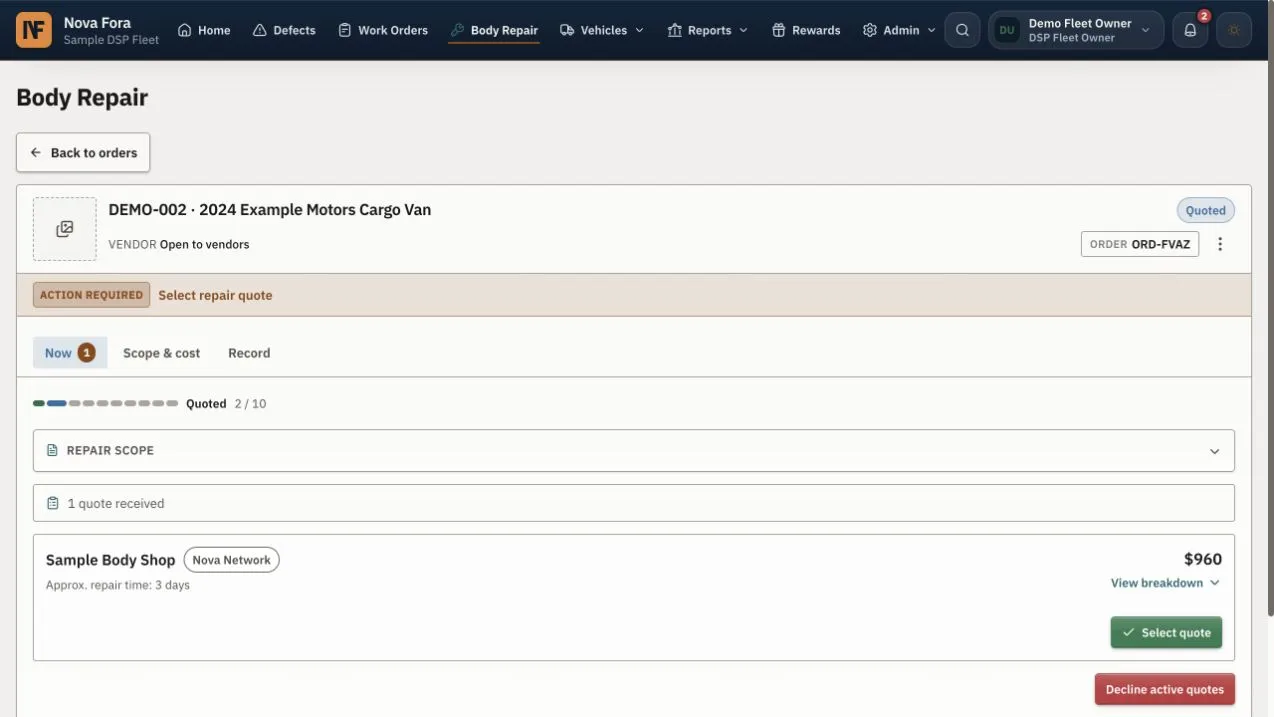
Check the vehicle at the top before selecting a quote or approving work. The figures and vehicle shown here are examples, not current pricing.
Read the Queue and the Dates
Section titled “Read the Queue and the Dates”Use the request-list filter to choose active work, individual stages, completed repairs, or canceled requests. Choose Reset to active to return to current work. If you cannot see an older job, check these filters before starting another request. Use Show more when offered to reach more requests.
The order’s date strip separates the pickup from the return:
| Label | What it tells you |
|---|---|
| Collection / Collection due | The planned pickup, before the shop records taking the van. |
| Collected | When the shop actually took it. |
| Due back | The current expected return date. Check a late indicator before assigning the van to a route. |
| Came back | The recorded return date. |
| Not booked yet / Not set | The relevant date has not been agreed or recorded. |
When the shop revises the repair dates, check the current Due back date and tell your dispatcher. An approved extension changes the expected return; a declined extension leaves the existing date in place. A date is a planning aid, not proof that the vehicle has been handed over.
Understand the Journey
Section titled “Understand the Journey”A typical repair follows this sequence:
- You describe the damage and the result you need.
- Shops quote for that work; you choose a quote.
- You and the selected shop agree on pickup and prepare inspection links.
- The shop completes the pickup inspection steps shown, then records taking the vehicle.
- The shop carries out the approved work. You review any change that needs your decision.
- The shop provides the after-repair inspection and finished report.
- You accept the report or send it back with a clear explanation.
- You complete the payment required by the request.
- The shop records the return, and your team checks the vehicle before using it.
Some requests need extra inspections, a revised quote, or help with an exception. Read the current action rather than assuming that every repair will move straight through these steps.
Prepare Your Repair Request
Section titled “Prepare Your Repair Request”Have the correct van, its location, damage photos, a recent PAVE Condition Report, and a pickup contact ready. A capture link opens the photo-taking process used to produce an inspection report. It is different from the finished report you review at the end of the repair.
Think about the result you need before requesting quotes. Repair quality is the target result you ask the shop to achieve. Read the choices in the form and pick the one that fits your needs; if you are unsure, discuss it with your manager before submitting.
Repair scope means the specific damage and work included in your request. Be precise. “Repair the dent in the left rear door and the scraped paint around it” gives a shop more to work with than “Fix the back.” Include damage you want addressed even if it is visible in a photo.
Reports and unused inspection links are different
Section titled “Reports and unused inspection links are different”A PAVE Condition Report describes an inspection that has already happened. It lists damage and the vehicle’s condition grade. Use the latest report that reflects the van’s condition. Fleet Improvement Fund, Redeployment/Retirement, and Wear & Tear reports are supported.
A PAVE inspection link starts a new inspection on a phone. The shop needs separate unused links for pickup and after-repair inspection. Keep those links unused when you send them to the shop.
Use How to get the report or How to get the inspection links beside the relevant field for illustrated help. To supply the report, open the completed Condition Report in PAVE and copy its report address, or upload its PDF. For unused links, request each link using an email inbox or phone you can access, then copy the plain link from the message without opening it. In email, copy the text below the blue button rather than the button’s address.
Create two separate unused links so pickup and repair completion do not share one. If the request collects them later, return with them when pickup confirmation asks for them. If a report shows the wrong vehicle, stop and obtain the correct one.
Create the request
Section titled “Create the request”- Open Body Repair and choose New Request.
- Select the vehicle and upload the PAVE report PDF or paste its report address when required. A PDF can be up to 25 MB. Do not put an unused inspection link in the report field.
- Wait for the vehicle and damage information to load. Check that the report belongs to this van.
- Select the damage to include. Import related body defects when appropriate, and add notes or photos for anything missing.
- Select the required repair quality.
- Review the eligible shops and any Station the form asks you to select. Use your actual assigned Station for network matching. If your DSP has an eligible personal body shop, you can continue with that shop without an assigned Station.
- Read the complete scope once more, then submit.
If no shop can receive the request, follow the invitation or shop-setup prompt before submitting. Nova Fora does not create an order with no repair destination. After successful submission, find the request in Body Repair. The eligible-shop preview helps you see where the request can go; it does not select a quote or mean a shop has agreed to the work.
If you start with a body defect on Defects, use the available Send to Shop action and complete the Body Repair request it opens. Check the imported damage before submitting. If the defect already has active repair work, open that request instead of creating another one.
Correct something you missed
Section titled “Correct something you missed”Before the first quote is submitted, open Repair Scope → Edit Request, correct the information, and save. After a shop has quoted, use Repair Comments to explain the change so it can be reflected in the quote. Avoid starting a second request for the same job.
Read the scope document
Section titled “Read the scope document”Choose View scope (PDF) in the repair scope box for the detailed work record. The box and PDF identify the selected components, target grade, and additional customer requests. After pickup damage is added, the scope marks what was added after collection. Reopen the updated scope before approving a changed quote or finished report; the original photos alone no longer describe the whole job.
Compare Quotes Before You Choose
Section titled “Compare Quotes Before You Choose”Open each quote and read its breakdown. Compare more than the headline total:
| Check | What to look for |
|---|---|
| Included work | Does it cover every damaged area you selected? Are exclusions explained? |
| Result | Does the shop understand the repair quality you requested? |
| Charges | Are parts, labor, materials, tax, and other charges clear? |
| Time | Is the repair duration workable for your fleet? What collection date is proposed or still needs arranging? |
| Validity | Can the quote still be selected, or has it expired? |
| Questions | Has the shop answered anything that would affect your decision? |
For example, one shop may quote for a door repair while another includes both the door and surrounding paintwork. Ask about that difference before deciding that one is cheaper for the same job.
Use Repair Comments to ask the relevant shop a question. During quoting, each shop has a private conversation with you; other bidding shops cannot see it. Check which shop’s thread you are replying to. You can include useful images with a comment when needed.
When you have authority to proceed, choose Select quote and review the confirmation. The selected shop can then arrange pickup. Quote selection does not mean the shop already has the vehicle.
If a quote has expired
Section titled “If a quote has expired”A quote may remain visible after its validity deadline but be unavailable for selection. Ask the shop to renew or adjust it. Recheck the scope, price, and dates when the updated quote arrives. A collection date tells you when the van can be picked up; the repair duration tells you how long the work is expected to take.
Confirm Pickup and Prepare the Vehicle
Section titled “Confirm Pickup and Prepare the Vehicle”When the shop proposes pickup, check the date, time window, location, and contact. Make sure the van will be there and someone knows how to hand over the keys.
- Open the pickup request and review the arrangements.
- Add the required before-repair and after-repair capture links if they are missing.
- Correct an unused link if it belongs to the wrong vehicle. Once a link has been used, it is part of the repair record and cannot simply be replaced.
- Confirm pickup when the details and links are ready.
- Tell your dispatcher where the vehicle needs to be and who is meeting the shop.
Use clear parking and key instructions. Keep door codes and other access secrets out of general repair comments.
The shop follows the pickup inspection steps shown on the request. Nova Fora may require the report before allowing the shop to record custody; if the report stalls, the shop must follow the recovery action offered. A booked pickup time alone does not record the handoff.
Check Out means the shop takes the vehicle from your DSP. Check In means it returns the vehicle to your DSP. Read the physical action and check the custody record after the handoff. Older screenshots may show earlier labels. See pickup and return terminology.
Handle New Damage or a Change in Price
Section titled “Handle New Damage or a Change in Price”The pickup inspection may show damage that was not in the original request. Read the finding and compare it with your approved scope and target quality.
The finding distinguishes damage not listed in the original report from an existing damage recorded as more severe. Open the damage counts to see the affected panels, descriptions, sizes, and photos. The same damage getting worse is not automatically a second, new damage.
| What the finding says | What happens next |
|---|---|
| The target grade is unaffected | The repair can proceed as agreed; no decision is needed solely because the finding exists. |
| More work is needed to reach the target | The shop reviews the scope and adjusts the quote if needed. Wait for the actual proposal before approving anything. |
| The shop will do it at no extra cost | The added work joins the repair scope without a customer price-approval step. Review the updated scope; no extra payment is requested for that change. |
| The shop proposes a higher price | Compare the old and new lines, total, reason, and dates, then approve or decline the revision. |
A price reduction or date-only revision can apply without a price-approval step. Every price increase needs your approval. Check the current total and dates after any change.
For separately requested additional work, the shop may send a supplement. A supplement is a request for additional work and cost that was not in the selected quote.
Before making a decision:
- Look at the new photos and explanation.
- Compare the proposed work with the original quote.
- Check the change in total and expected time.
- Ask the shop about anything unclear in Repair Comments.
- Use the decision shown only when you have the required authority.
For example, the shop might discover damage behind a panel after inspecting the van. Ask what was found, what work it adds, and how that changes the total. The finding itself is not permission to charge more.
If you cannot approve the change, explain what needs clarification or involve your approver. Do not leave the shop guessing whether it should proceed. A pending decision can hold up the job.
While the Vehicle Is at the Shop
Section titled “While the Vehicle Is at the Shop”Open the request to check the current stage and Action Required. The DSP view may say In Shop while the shop sees In Repair for the same stage.
Read new comments, reply to questions, and tell your dispatcher if a delay changes the vehicle plan. Keep decisions in the request so the next person can see what was agreed. Check the record even if you are also speaking to the shop by phone.
After completing the work, the shop uses the after-repair inspection to compare the result with the requested quality. If another capture is needed, follow the request for a new link. If the shop says the target cannot be reached, read its explanation and supporting evidence before deciding what to do next. A quality shortfall should be understood before you approve the finished work.
Review the Finished Report
Section titled “Review the Finished Report”The finished report is your chance to check the work against what you approved. Open the request when it needs sign-off and work through it carefully:
- Match the vehicle and shop.
- Compare each item in the approved scope with the shop’s result.
- Review the before-and-after inspection, photos, and notes.
- Read the explanation for anything marked not repaired or not repairable.
- Check that approved changes are reflected in the report and final total.
If something is wrong or incomplete, choose Reject and explain exactly what needs attention. “The left rear door is listed as repaired, but the completion photo still shows the dent” is more useful than “Not good enough.” The shop can correct the work or evidence and submit the report again.
If the report is correct, use the approval option shown. Approve without paying accepts the report but leaves payment outstanding. Approve and pay takes you into payment. Neither action records the physical return of the vehicle.
Pay and Check the Result
Section titled “Pay and Check the Result”From the approved request, choose Pay Now when payment is required, or continue from Approve and pay.
Read the final amount and its breakdown, then choose the payment method offered. When card and bank options show different fees, compare their final totals. Check any saved-card details before confirming. Saving a card for future repairs is your choice; use the save-card option only if you want that. Manage saved repair cards in Billing. The final payment page is where you confirm what will actually be charged.
After submitting, return to the request and check the payment result:
| Status or situation | What to do |
|---|---|
| Payment completed | Follow the request’s next step for return. |
| Bank payment processing | Wait for the result. Do not submit another payment because settlement is taking time. |
| Payment failed | Read the reason and use the retry or method-change option offered. |
| Result is unclear | Check the current request and contact support before trying again. |
Report approval, payment completion, and permission to return the vehicle are separate. The shop must follow the return action Nova Fora makes available. Do not assume that an email confirmation or a payment still processing has cleared every remaining step.
If you brought your own shop
Section titled “If you brought your own shop”Bring Your Own Vendor (BYOV) lets DSP Owners invite the body shop they already use. To invite a shop from organization settings:
- Open Admin and your organization settings.
- Under Shop relationships, find Personal body shop beside In-house shop.
- Select Invite your shop. Enter the shop name, email, and mobile number.
- Select Send. The shop must accept the invitation and complete signup.
The settings show Signup pending until the shop completes signup. You can also invite the shop from a new Body Repair request or the no-shop prompt. Each DSP can have one personal body shop. Enter a valid mobile number as well as the shop name and email. If the option is unavailable, ask support for help.
You can direct the request to the invited shop while signup is pending, so the job is waiting when the shop joins. The shop still needs to finish signup before it can respond; an invitation is not a quote or acceptance. An eligible personal shop can receive your repair without an assigned Station.
Read the payment instructions on that request. An own-shop repair can use a different payment arrangement from a network repair. Where the request tells you to pay the shop directly, arrange that payment with the shop. Paying a platform fee does not necessarily settle the shop’s bill. See the own-shop guidance.
Use a Referral Fee Waiver
Section titled “Use a Referral Fee Waiver”If you have an available referral reward, look for Referral fee waiver when choosing a quote or reviewing an eligible unpaid repair. Read the waiver value and expiry date, then choose Use one fee waiver if this is the repair where you want to use it.
A waiver removes the platform fee for one eligible Body Repair; it does not pay for the repair itself. It is not applied automatically. Check that the request says Reserved for this repair and that the displayed total reflects the choice. Use Remove fee waiver if you want to save it for another eligible repair before payment is fixed. Tax and any payment-processing fees are calculated at payment, so review the final charge there.
You can also review available and reserved waivers in Rewards. If the choice is absent, check your balance, expiry, role, and whether payment has already been prepared or completed. See rewards and referrals.
Receive the Vehicle
Section titled “Receive the Vehicle”Agree on the return contact, time, and location once the request allows return. When the vehicle arrives:
- Confirm the van and keys are correct.
- Compare its visible condition with the finished report.
- Check the final mileage and the pickup/return evidence.
- Raise any mismatch with the shop and your manager before the handoff details are forgotten.
- Check that the return is recorded and review remaining defects before assigning the vehicle to a route.
A completed Body Repair does not resolve an unrelated tire or mechanical problem. Your team still decides whether the vehicle is ready for service.
If asked for feedback, rate the repair after reviewing the returned vehicle. Keep your comments factual and specific to the work.
Save the Documents
Section titled “Save the Documents”Use Download documentation when it is available on the request. It gathers the documents available for your role and the repair’s current stage. Review the scope, quote, finished report, invoice, and receipt as applicable, then keep them using your team’s normal filing process.
If there is no receipt, check whether payment has completed. Invoice Mileage In means the pickup reading; Mileage Out means the return reading. These invoice labels differ from the Check Out and Check In custody actions.
When Plans Change
Section titled “When Plans Change”You no longer need the repair
Section titled “You no longer need the repair”Before the shop takes custody, use the cancel action if it is available. A selected shop can also withdraw before pickup and must give a reason. Read the updated request and arrange a new plan with your team.
After pickup, ordinary cancellation is no longer the right action. Follow the stop-work option and arrange the safe return of the vehicle. A canceled request can remain visible while the shop still has the van; confirm the physical return before treating it as closed.
No shop is available
Section titled “No shop is available”If the page says no network shops serve your area, use Invite your shop to invite the body shop you already use. Once it appears as the destination, you can continue even while its signup is pending. If an existing request has a routing problem, ask your manager or support to help resolve it. Do not select an unrelated Station to get past the message.
An inspection or next action is stuck
Section titled “An inspection or next action is stuck”Refresh the request and check whether a teammate or shop has just updated it. Read any missing-link, inspection, approval, or payment message. Follow the recovery action shown or contact support with the vehicle, current stage, and message. Do not replace a used inspection link or repeat a payment to try to move the job forward.
A problem appears after the repair
Section titled “A problem appears after the repair”Open the completed request and use the warranty action if it is available within the allowed period. Describe the problem and when you noticed it, and add clear photos. Nova Fora support reviews the claim. Follow the claim’s status rather than treating submission as approval of a free repair.
Walk Through Your First Repair Together
Section titled “Walk Through Your First Repair Together”Use a sample request with your manager. Find the scope, compare a quote, explain the pickup arrangements, and identify where you would review added work. Then open a finished report and discuss what would make you approve it or send it back.
Before working alone, be comfortable answering these questions:
- What work and repair quality did we ask for?
- Which decision is waiting, and who can make it?
- Has the shop actually taken the vehicle, or is pickup only scheduled?
- Does the finished report account for every approved item?
- Is payment complete, and does the request allow return?
- Have we received the van and checked its remaining defects?
For shop-side instructions, see the Body Repair workflow guide. For help with everyday fleet work, return to New DSP Training.