New DSP Training
Welcome to your first shift with Nova Fora. As part of a delivery service provider (DSP) team, you’ll use it to find vehicles, report problems, follow repairs, and help get vans ready for their routes. This guide walks you through the work you’re most likely to do first, with particular attention to Body Repair—from describing damage to getting the van back.
Sit down with your manager and work through a few examples together. Use sample vehicles in a training workspace for practice. If you are looking at real fleet records, talk through what you would do without sending a request or approving work just to try it out.
Find the Task You Need
Section titled “Find the Task You Need”You can read this guide in order during your first shift or jump to the task in front of you.
| What you need to do | Start here |
|---|---|
| Manage a body repair from request to return | Your first body repair and the full DSP walkthrough |
| Find out what happened overnight | Daily digest and morning summary |
| Look up a van or a reported problem quickly | Home search |
| Review a problem and arrange a repair | Defects and Send to Shop |
| Inspect a van or report new damage | Inspections and reporting a problem |
| See when a shop will work on a vehicle | Repair progress and shop updates |
| Check or correct vehicle details | Vehicles and New Vans |
| Read an alert or change how it arrives | Notifications |
| Prepare keys, receive a van, or hand over a shift | Pickup and return and end-of-day planning |
| Report through your team’s Slack channel | Roger |
What You Need to Know First
Section titled “What You Need to Know First”| Term | What it means for your work |
|---|---|
| Defect | A reported vehicle problem. Reviewing or approving it does not mean the repair is finished. |
| Work Order | The shop’s mechanical repair record. DSPs open it from Home, Defects, or a vehicle; there is no separate DSP Work Orders menu. |
| Body Repair | A separate damage-repair journey with scope, quotes, pickup, inspections, report approval, payment, and return. |
| Station | The operating Station assigned to the DSP. Where geographic routing is enabled, its location helps determine eligible shops. It is different from the vehicle’s parking location. |
| Custody | The recorded pickup and return of the vehicle. Repair completion and physical return are separate events. |
| External vendor | An email-only repair destination. Arrange and track the repair directly with that vendor. |
First Session: Get Ready
Section titled “First Session: Get Ready”Start by accepting your invitation and signing in with your own account. Your manager can help if the business name or your role looks wrong.
- Follow DSP onboarding. Confirm the organization, time zone, Stations, contacts, fleet, and agreements.
- Sign in with your own account. Confirm which actions your role permits in the DSP Guide.
- Ask the Owner to name who reviews defects, approves repair costs, prepares keys, receives returned vehicles, and covers absences. Your account role determines which actions you can take.
- Open one known vehicle. Match its fleet number, plate, and vehicle identification number (VIN). Check location, mileage, status, open defects, and custody.
- Set your notification choices. Phone verification, text-message topics, and two-factor authentication are separate steps.
Before moving on, find a vehicle together and make sure you know who to ask about repair approvals.
Review a Body Repair Quote and Finished Work
Section titled “Review a Body Repair Quote and Finished Work”Body Repair is a core part of your DSP work. Start with a sample damage request and follow it all the way through with your manager. Use Body Repair for DSPs as your detailed guide.
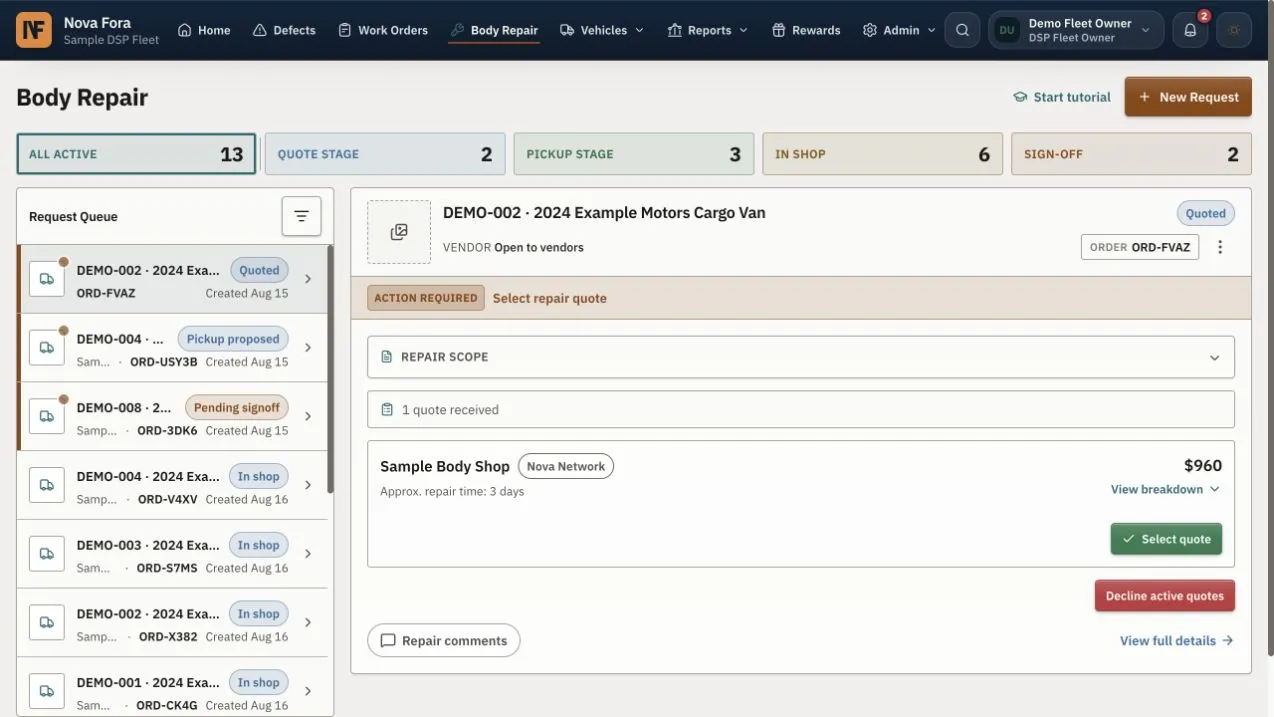
Choose the request on the left, then read Action Required. In this earlier sample, the DSP needs to select a quote.
Start with the right request
Section titled “Start with the right request”Open Body Repair → New Request, select the van, and add the completed PAVE report requested. Check the damage, import related body defects, and add missing notes or photos. Choose the repair quality you need and review the complete scope before submitting.
The scope is the work you want quoted. For example, specify both the damaged rear door and the surrounding scraped paint if both need attention. An eligible-shop preview does not mean a quote has been selected.
Work through the decisions
Section titled “Work through the decisions”When quotes arrive, compare what each shop includes before choosing. Ask questions in the correct shop’s Repair Comments thread. Then follow the request through these decisions:
- Compare the quote with the requested scope, photos, repair quality, duration, and total. Read its validity deadline.
- Select a quote only with the required authority. If it expired, ask for renewal or an updated quote.
- Confirm pickup details, contact, keys, and required capture links. A scheduled date does not record physical pickup.
- If the pickup inspection finds different damage, read the finding and proposed scope or price change. Approve added work only after review.
- Review the finished report item by item. Reject with a clear reason if the work or evidence is incomplete.
- If the report is correct, use the approval option shown. Approve without paying leaves payment outstanding. If paying, review the method and final total and confirm the result once.
- Follow the payment and return status. A processing bank payment is not a completed payment. Confirm the physical return and check remaining defects before release to service.
Use the newer repair tools
Section titled “Use the newer repair tools”- Check Collection and Due back on the order before planning routes. Recheck the return date after an approved extension.
- Open View scope (PDF) to see the agreed work and damage added after collection.
- A pickup finding separates newly reported damage from existing damage recorded as worse. If the shop covers the needed work at no extra cost, the scope updates without asking you to approve a higher price. Review and decide on any price increase.
- If no network shop serves your area, invite your own shop. You can direct the request to it while signup is pending; it can respond after joining.
- Use separate unused PAVE links for pickup and post-repair scans. The intake report is a completed report, not an unused capture link.
- When offered, choose whether to apply a referral fee waiver and whether to save your payment card. Check the final payment total.
Close out the job
Section titled “Close out the job”Check the returned van and keys against the finished report, mileage, and photos. Review any unrelated defects before assigning it to a route. Use Download documentation when available to keep the quote, report, invoice, and receipt. If a problem appears later, check the completed request for the warranty action.
Remember that choosing a quote, approving the finished work, paying, and receiving the vehicle are separate steps. The full DSP Body Repair guide explains added costs, inspection delays, your own shop, cancellation, and warranty follow-up.
Start Your Day on Home
Section titled “Start Your Day on Home”Open Home before loadout, when you are deciding which vehicles can go out on routes. Start with critical defects and vehicles that are grounded or at risk of being grounded. Then review inspections, repairs awaiting approval, scheduled repairs, vehicles at shops, and feedback that needs your attention.
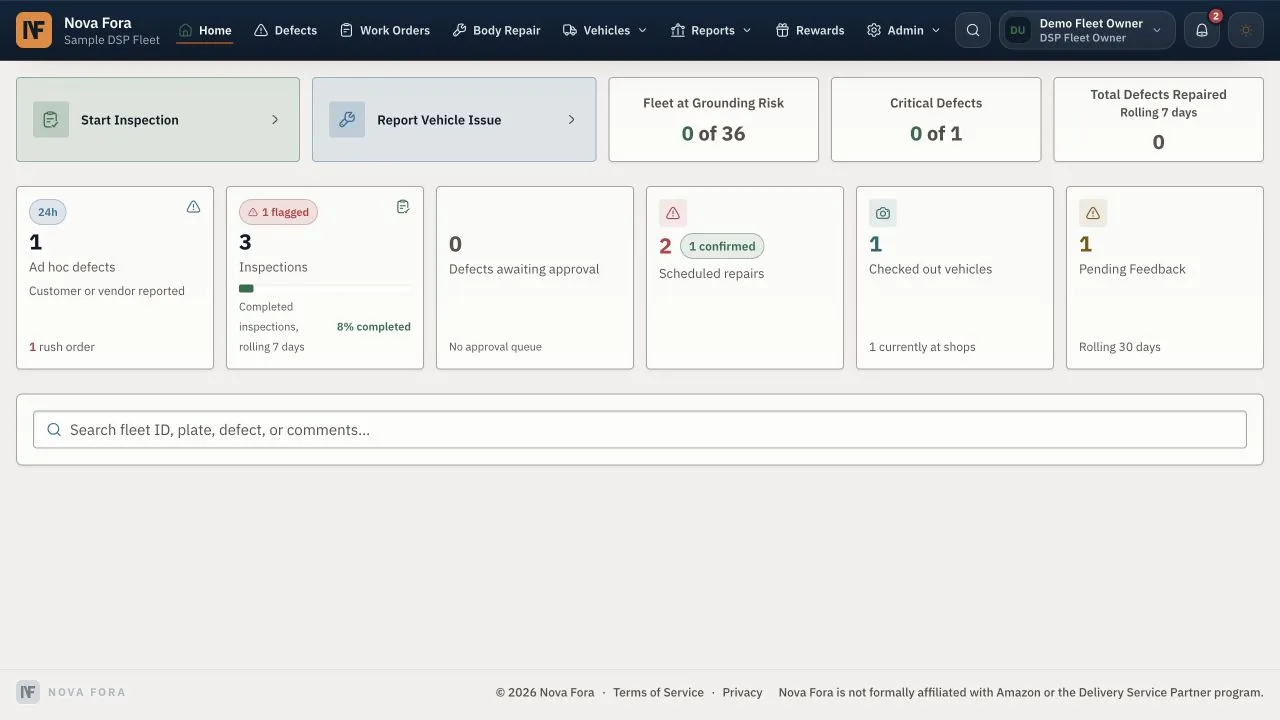
The search box sits below the Home cards. This earlier sample also shows a Work Orders menu; DSPs now open repair work from Home, Defects, or a vehicle.
Open the group you want to review and read the individual records. A number on a card tells you where to look; the record tells you what needs doing. Agree with your manager who will handle anything urgent before the vehicles leave.
Read Your Daily Digest and Morning Summary
Section titled “Read Your Daily Digest and Morning Summary”Your morning repair digest is a useful way to see what shops completed and what is still open. If email delivery is enabled for you, open the digest and check its service date first. Read through the completed, open, and canceled work, then follow the link into Nova Fora for anything that needs attention.
DSP Owners and Managers can review the Morning Work Summary on Home:
- Open the summary banner and check the service date.
- Compare Scheduled, Completed, Still Open, and Canceled. Start with unfinished work that could affect today’s routes.
- Read the vehicle, shop, planned work, and any explanation. Use Call Shop when you need an immediate answer.
- Review completed work, including anything marked late. Use Rate Repair when it is offered and you have checked the work.
- Choose Acknowledge and Hide after your review. This hides the summary for you; it does not finish a repair or change a vehicle’s condition.
For example, if a tire repair is still open and the van is due out this morning, contact the shop and arrange the next step with your dispatcher. Don’t assume the work is finished because it was scheduled overnight.
A digest reflects the information available when it was sent. The shop may have updated the repair since then, so check the current record before acting. If the email does not arrive, open Home and your notification inbox rather than waiting. See digest delivery and settings.
Find a Vehicle or Problem from Home
Section titled “Find a Vehicle or Problem from Home”Use the search box on Home when someone asks, “What’s happening with this van?” You can search for a fleet number, license plate, defect, or words from a comment.
- Click or tap the search box below the Home cards.
- Enter at least two characters. Try a vehicle number or a word such as
mirrorfrom the reported problem. - Check the vehicle label and plate in the results. For a problem, read the description and status so you choose the right record.
- When a vehicle summary appears, review its condition and scheduled work, including the shop and date when shown.
- Open the matching vehicle, defect, or repair to read the details and take the next step.
Search helps you find work; it doesn’t create a new report. If the same problem already has a repair underway, follow that repair instead of sending it again. If there are no matches, check the spelling, try the plate or a shorter phrase, or open Vehicles to search the fleet list.
Try this with your manager: find a known van by fleet number, then search for a problem on it. Explain what the results tell you and which record you would open next.
Keep Vehicle Details Up to Date
Section titled “Keep Vehicle Details Up to Date”Open Vehicles when you need the fleet list or the vehicle’s full history. Search by vehicle number, plate, VIN, rental label, make, or model, and use the filters to narrow the list.
Open the vehicle and compare its details with the van you are working with. Check its location, mileage, status, open defects, inspection history, and current shop work. If your role allows changes, choose Edit, correct the information, save, and check the result. Use Back to return to the list with your search and filters.
If a van is missing, clear the filters and check Vehicles → New Vans. A report may need to be matched to an existing vehicle. Compare the VIN and plate before adding anything new; ask the person responsible for the fleet to resolve an uncertain match.
For adding vehicles, importing a fleet, exports, or changes of ownership, use Fleet and Vehicles. These are occasional fleet-management tasks, so ask your manager which ones belong to your role.
Complete or Resume an Inspection
Section titled “Complete or Resume an Inspection”Use Start Inspection on Home or a vehicle page when you need to work through the inspection checklist. If you are following a schedule, check the vehicle, date, and location first.
- Confirm that the selected vehicle is the one in front of you.
- If Nova Fora offers to resume an unfinished inspection, check the vehicle and saved time before choosing Resume.
- Record the mileage and inspect each checklist item. Add the requested notes and photos for any problem.
- Review the summary, wait for photo uploads to finish, and submit once.
- Open the saved inspection in the vehicle history and make sure any urgent finding has someone following up.
If you cannot inspect the vehicle—for example, because the keys are unavailable—use the available unable-to-inspect option and explain why. Do not submit an all-clear result for a vehicle you could not check.
To review someone else’s inspection, open Latest Inspections or the vehicle history. Check the date, result, notes, and photos. Your post-inspection report can also flag vehicles that were missed and critical defects that need attention. See inspection instructions and reports.
Report Your First Vehicle Problem
Section titled “Report Your First Vehicle Problem”Imagine you find a damaged mirror before a route. Here is how to help the next person understand what happened.
- Confirm the vehicle. Use Start Inspection for the scheduled checklist or Report Vehicle Issue for a problem found outside an inspection.
- Record the current mileage and the exact part and position. Write what you observed, not an assumed diagnosis.
- Add a clear overview and close photo when useful. Wait for uploads to finish.
- Review and submit in the training workspace. Reopen the saved record.
- Explain who must review the defect and how your team keeps an unsafe vehicle out of service.
Ask your teammate to read the saved report. Can they tell which vehicle and part need attention, how serious the problem is, and what should happen next? Follow inspection and defect instructions for the full procedure.
Review the Defects Page and Send Work to a Shop
Section titled “Review the Defects Page and Send Work to a Shop”Open Defects when you want to work through reported problems, including findings from inspections. Choose Open defects, then search for a vehicle or problem. Use the repair-category and status filters to focus on the work you need to review.
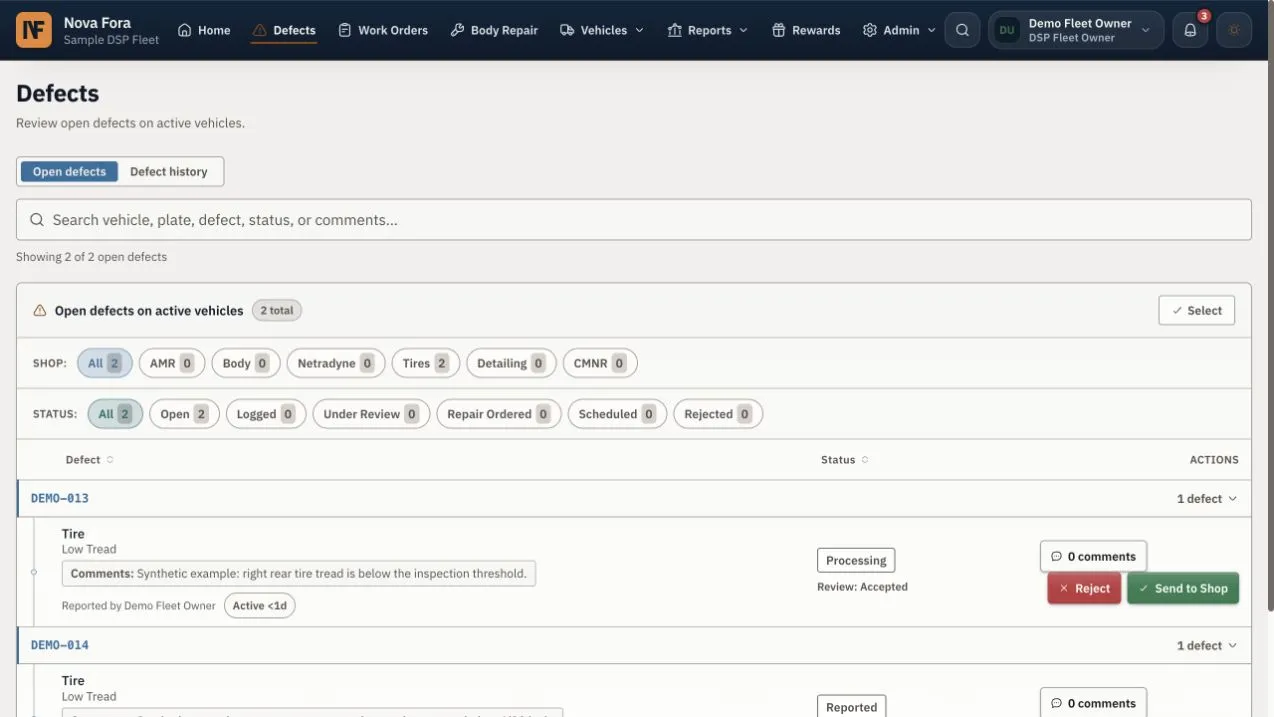
Expand the vehicle’s row to read its defects. In this earlier example, Send to Shop is the green button on the right. Read the current repair status before using it; a visible button does not mean the work needs to be sent again.
Read the notes, photos, severity, and review status. Check whether a shop is already handling the problem. Use Defect history when you need to understand earlier decisions rather than treating an old finding as new work.
Before sending work, review the reported problem and confirm that you are allowed to approve it. Have the shop you want to use in mind.
- On Defects, find and expand the vehicle, then review the problem you want to send. You can also reach it from Home search or the vehicle record.
- If active work already covers it, open that work. Do not create a duplicate.
- Use Send to Shop when available. Review the repair type, Station when requested, and the proposed destination before confirming.
- For a body defect that still needs routing, complete the Body Repair request and confirm the imported damage scope.
- For a Nova shop, follow the request and its next action. For an External · Email only destination, read the warning and arrange acceptance, timing, price, progress, and custody directly with the vendor.
- Check the confirmation. If delivery fails or routing remains pending, follow up; do not assume the shop accepted.
Before leaving the request, check where it went and whether anyone still needs to respond. Email-only requests close after seven days; that closure is not proof of repair. See shop settings and mechanical repair.
Follow Repair Progress and Answer the Shop
Section titled “Follow Repair Progress and Answer the Shop”After you send work, return to the related repair from Home, the defect, or the vehicle. Check whether the shop has accepted it, whether it has a date, and whether a question or approval is holding it up.
If the shop needs a decision, read the requested work and cost before approving it. Ask the person with approval authority if the decision is outside your role. When the schedule changes, tell the person preparing the vehicle and keys.
For Body Repair, read and reply in Repair Comments. During quoting, select the correct shop’s conversation before replying. Keep your answer specific—for example, “The van will be in the north lot after 7 p.m.; contact the dispatcher for keys.” Keep access codes out of comments.
When a shop marks work complete, check the repair details and the vehicle’s remaining defects. Repair completion, physical return, and readiness for a route are separate checks. See mechanical repairs for the full journey.
Read Notifications and Choose Your Alerts
Section titled “Read Notifications and Choose Your Alerts”Select the bell icon to open your notifications. Open a message, then its related vehicle or repair, and check whether it still needs action. Another teammate may already have handled it.
Marking a message as read only records that you have read it. Choose Resolve when no more action is needed; clearing a notification does not complete the repair itself.
To change delivery, open Settings → Notifications, choose the topics and available email, text, or browser channels, and select Save Preferences. Texts require a verified phone number. Browser alerts must be enabled on the device and browser you use.
For digests, both the organization’s schedule and your own delivery preferences matter. If messages are missing, check your inbox and preferences, then ask an administrator to check the digest time and time zone. See Notifications and DSP Digests.
Prepare for Pickup and Check a Return
Section titled “Prepare for Pickup and Check a Return”Before a shop takes a vehicle, confirm the date, location, contact, and key arrangements. Make sure the person handing it over knows what mileage, photos, or inspection evidence is required.
When it comes back, compare the vehicle and keys with the return record. Read the repair report and look at any unresolved defects before treating the van as ready for a route. Raise a mismatch with the shop and your manager while the details are fresh.
If Nova Fora asks for feedback, rate the completed work after checking the vehicle. See vehicle pickup and return for the detailed handoff steps.
Use the Same Handoff Words
Section titled “Use the Same Handoff Words”| Term | Physical event |
|---|---|
| Check Out | The vendor takes custody of the vehicle from the DSP. |
| Check In | The vendor returns the vehicle to the DSP. |
Invoice labels are a separate convention: Mileage In is the pickup reading and Mileage Out is the return reading. These invoice labels stay unchanged.
Use these definitions for both repair workflows. Read the physical action in the confirmation and check the custody record. Older Body Repair screenshots can use different labels; see What Changed.
Prepare for Tomorrow and Hand Over Your Shift
Section titled “Prepare for Tomorrow and Hand Over Your Shift”If you receive the Evening Repair Schedule digest, check the calendar date and review tomorrow’s vehicles, shops, and work still needing confirmation. Open Nova Fora to confirm the latest schedule, parking location, keys, and pickup arrangements.
Before leaving, hand over grounded vehicles, missed inspections, outstanding approvals, vans still at shops, and expected returns. For each one, say who will act and when. For example: “Van 24 is still at the tire shop. The dispatcher will call at 7 a.m. before assigning it to a route.”
Before You Work on Your Own
Section titled “Before You Work on Your Own”Go through this list with your manager. Use it to spot anything you would like more help with:
- Read a daily digest and find the current Morning Work Summary, if available to your role.
- Use Home search to find a vehicle and a problem mentioned in a comment.
- Filter the Defects page and explain when to use Send to Shop.
- Open a notification, find the related work, and check your delivery preferences.
- Review tomorrow’s schedule and explain the key arrangements.
- Find a vehicle and return to the filtered fleet list with Back.
- Explain the difference between a defect, a Work Order, and Body Repair.
- Produce one clear inspection or issue record with complete evidence.
- Choose a repair destination and explain external-vendor tracking limits.
- Review scope, quote expiry, changed work, and a finished report.
- Explain who can approve cost and why approval does not always mean payment.
- Read pickup and return evidence without reversing the custody labels.
- Hand over an unresolved item with a person and due time.
- Find help without sharing passwords, verification codes, or private access instructions.
Let your manager know which tasks you feel comfortable with and which you would like to try together again. Keep a short note of any follow-up practice.
When to Stop and Ask for Help
Section titled “When to Stop and Ask for Help”Stop if the vehicle is wrong, approval authority is unclear, the same problem already has active work, or a handoff record does not match reality. For a missing action, check role, organization, current status, and required evidence first. Give your manager the visible vehicle or order reference, action attempted, exact message, and time. See Solve Common Problems.
If Your Team Uses Roger in Slack
Section titled “If Your Team Uses Roger in Slack”Ask your manager to show you the Roger reporting action and the channel your drivers use. Work through a sample report together, including how to check its response and who follows up in Nova Fora. See Roger and Slack for setup, reporting, and help when a message does not get through.