New Vendor Training
Welcome to Nova Fora. Your shop will use it to receive repair requests, keep the customer updated, and record the work you’ve done. Clear notes and photos help the customer decide what to approve and help your teammates pick up where you left off.
Work through this guide with a Vendor Admin or Service Writer. Use sample jobs in a training workspace when you want to try an action. With real customer jobs, talk through the next step together without submitting changes just for practice.
Know Your Work Area and Role
Section titled “Know Your Work Area and Role”| Work or role | Start here |
|---|---|
| Mechanical, tire, or routine service | Work Orders: incoming requests, accepted work, assignment, schedule, completion, and custody. |
| Body repair | Body Repair: quote, pickup, inspections, repair, finished report, payment status, and return. |
| Vendor Admin | Shop setup, staff and services, operational oversight, and permitted financial settings. |
| Service Writer | Intake, scope, assignment, schedule, customer communication, and handoff coordination. |
| Foreman or Technician | Assigned work, inspections, repair evidence, and blockers within the available permissions. |
| Vendor Viewer | Read permitted records; ask the responsible person to make changes. |
A body-only shop can have a different menu and setup sequence. Do not enable mechanical services to expose extra screens. See the Vendor Onboarding Guide and the role guides in the Vendor User Manual.
First Session: Prepare the Shop
Section titled “First Session: Prepare the Shop”Sign in with your own account and check that you are in the right shop. Ask your manager to walk through these details with you.
- Confirm the business address, time zone, services, workshops, and contact person.
- Check the Stations and service area your shop actually serves. Depending on the service-area rules in use, a shop may need to be within the allowed area even if it is a preferred shop.
- Set staff roles and teams where the setup asks for them. Name who accepts work, prepares quotes, schedules visits, checks evidence, and covers absences.
- Review pickup and return instructions and the shop’s required custody evidence.
- For Body Repair, have the authorized person complete payout setup and check readiness. Do not put bank details in repair comments.
- Choose notification topics and channels. Verify your phone before relying on SMS; then check the saved topic choices.
Make sure you can find your assigned work and know who to ask about customer approvals and payments.
Start with Body Repair Pickups and Returns
Section titled “Start with Body Repair Pickups and Returns”On Body Repair, review Pickups & drop-offs for today and overdue vehicles. Select Pick up or Drop off to filter the queue, then open the request to check the next action. Use All customers if a customer filter is hiding part of the list. Due dates tell you what needs follow-up; the request still controls whether pickup or return can proceed.
Read the order’s Due back date after any revision. For new pickup damage, open the panel/photo list and decide whether you can keep the target grade at the same price. If so, adjust the quote at the same total and use the updated scope. A higher price requires customer approval. Read Still to address before finalizing the repair report, then review and confirm the report before sending it.
Daily Routine
Section titled “Daily Routine”- Open Home in the correct workshop. Body-only teams start with their Body Repair queue.
- Review incoming and overdue work, quote deadlines, pickups, inspections, blocked repairs, reports awaiting review, and returns.
- Open each actionable record and confirm its current state. Read new customer comments before acting.
- Assign an owner and realistic next time. Record a blocker as soon as it is known.
- Before the shift ends, hand over every vehicle in custody and every outstanding approval or promised return.
The queue’s age and performance measures help prioritize work. They do not grant approval to start extra work or release a vehicle.
Accept Your First Mechanical Job
Section titled “Accept Your First Mechanical Job”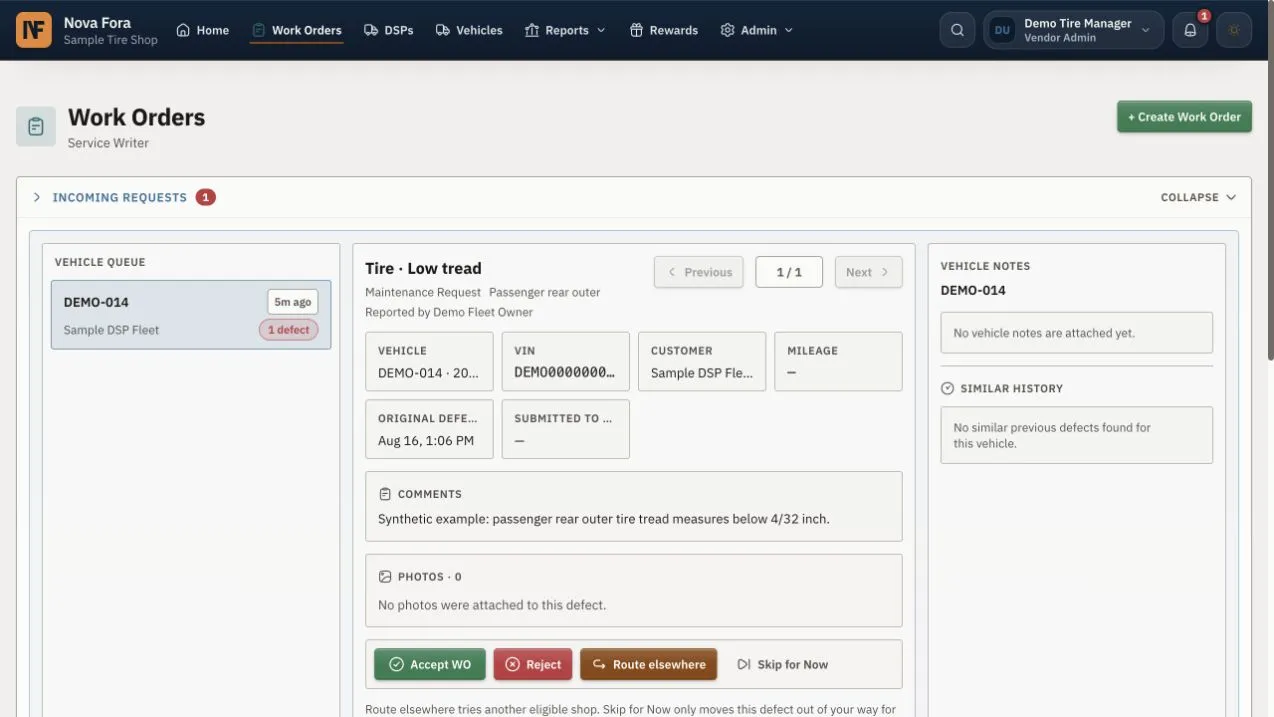
Choose the vehicle on the left, read the problem in the center, and review the available actions below it.
Start with a tire repair request and work through it with your Service Writer.
- Open the incoming request. Match the vehicle, customer, repair type, location, timing, photos, and history.
- Accept only if the shop can do the work. Otherwise use the available reject, defer, or routing action and give a useful reason.
- Open accepted work. Confirm the repair-order number if your process uses one, team, technician, date, and time.
- Reopen the record to confirm the saved plan. Tell the DSP about a change through the normal repair communication process.
- Explain how you will record diagnosis, approved work, photos, and anything that cannot be completed.
Find the accepted job again and check who is doing it and when. If work is waiting on parts or a reply, leave it open and explain what is holding it up. Follow mechanical repair.
Prepare a Body Repair Quote
Section titled “Prepare a Body Repair Quote”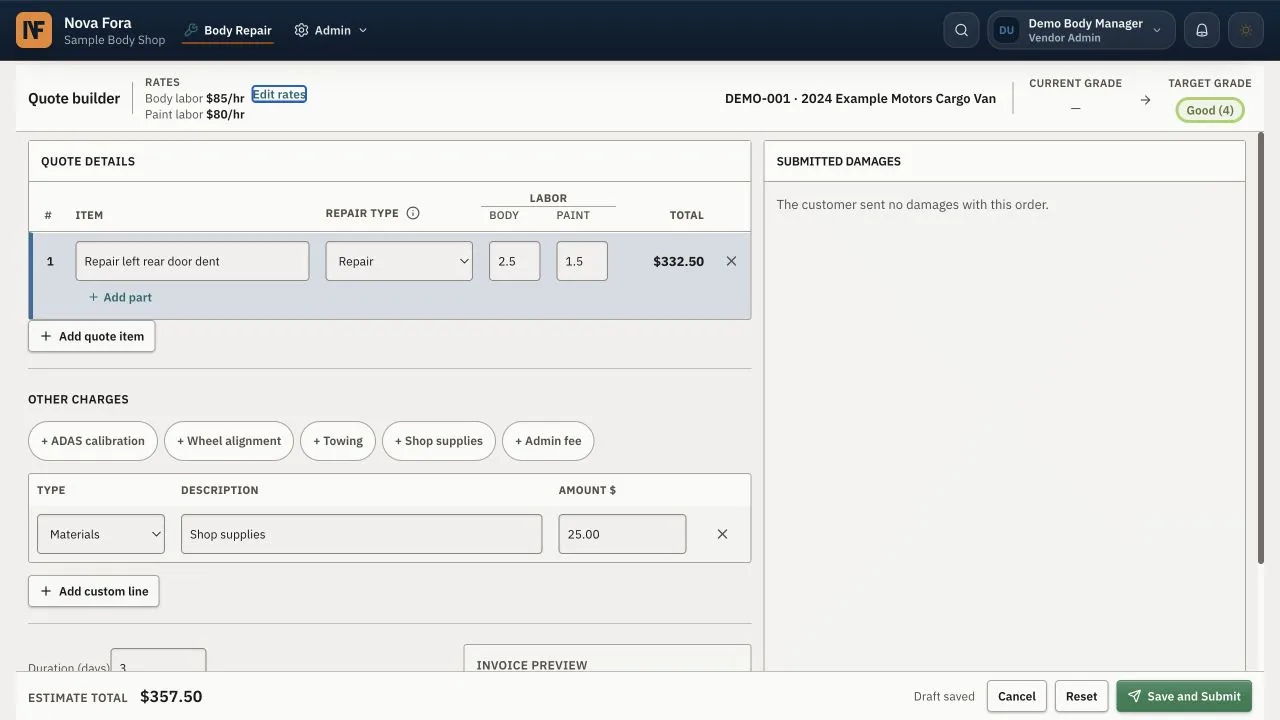
Add the work and charges to the quote, then review the total before sending it to the customer. The amounts shown are examples.
Open a request your shop can quote on. Make sure you understand the requested work before setting a price.
- Review the vehicle, requested quality, scope, notes, inspection report, and every useful photo.
- Ask questions in Repair Comments. During bidding, your shop’s conversation with the customer is private from other shops.
- Add distinct repair operations, parts, quantities, labor, materials, fees, duration, and any required charges. Review the customer total and the shop’s own amounts in their labeled fields.
- Save a draft if you need more information. Submit only when the scope and price are ready.
- Check the quote deadline. If it expires, use the available renewal or adjustment action before expecting the customer to select it.
- After selection, review pickup details. Selection does not record custody and does not authorize unrelated added work.
Before sending your first quote, ask your Service Writer to check that it covers the requested work and that the time and charges are clear. See Body Repair.
Pick Up a Vehicle
Section titled “Pick Up a Vehicle”| Term | Physical event |
|---|---|
| Check Out | The vendor takes custody of the vehicle from the DSP. |
| Check In | The vendor returns the vehicle to the DSP. |
Invoice labels are a separate convention: Mileage In is the pickup reading and Mileage Out is the return reading. These invoice labels stay unchanged.
Use these definitions for both repair workflows. On an older screen, confirm the physical pickup or return action before submitting; see the terminology update.
- Match the vehicle in front of you to the fleet number, plate, and description.
- Confirm keys, location, contact, and current odometer reading.
- Read the required evidence. Mechanical pickup can require mileage and photos or a submitted full inspection. Body pickup requires the odometer evidence shown in its form.
- Wait for each required photo to upload. Correct a mismatch before submitting.
- Submit once and reopen the custody record. Confirm the vehicle is now recorded with your shop.
Check that the record says your shop now has the vehicle. For mechanical work, saving an inspection as a draft is not enough to complete pickup; submit the inspection if one is required. See custody instructions.
Handle New Damage and Finish the Repair
Section titled “Handle New Damage and Finish the Repair”Sometimes the pickup inspection reveals damage the customer did not report. Here is how to work through that with them.
- Open the finding and compare it with the approved scope and requested repair quality.
- Read the stated next action. Extra damage can be informational if the promised quality is still achievable; it can require an updated quote if that quality is at risk.
- Submit the needed adjustment or supplement with a reason and evidence. Wait for required customer approval before doing added work.
- Complete the approved repair and after-repair inspection. Review the comparison and any remaining quality shortfall.
- Complete every finished-report item with a repaired result and evidence, or a clear reason it could not be repaired.
- Send the report. If rejected, read the reason, correct the work or evidence, and send it again.
- Check the release action and payment state before arranging return. An approved report can still be unpaid; customer payment and the shop’s bank payout are separate states.
- Record return mileage and required photos, the keys, and the recipient. Reopen the record to confirm custody is closed.
Before returning the vehicle, check that Nova Fora allows the return. An approved report or a payment that is still processing may leave another step to finish.
Write Updates the Next Person Can Use
Section titled “Write Updates the Next Person Can Use”A useful update says what happened, what is still needed, and who will do it. For example: “Replacement part received. Mirror fitted and tested. Completion photos still needed. Assigned technician will upload them before report review.”
Keep customer information within the proper record. Do not include passwords, bank details, door codes, or verification codes. Photos should show the vehicle and work, without unrelated people or documents.
Before You Work on Your Own
Section titled “Before You Work on Your Own”- Find the correct workshop, customer, and work queue.
- Explain what your role can change and who approves added work.
- Review and accept or decline a mechanical request when that service applies.
- Prepare a complete body quote when that service applies.
- Explain quote expiry, changed scope, and pickup findings.
- Record the correct pickup action and required evidence.
- Report a blocker without marking unfinished work complete.
- Prepare a finished report and explain rejection recovery.
- Distinguish report approval, customer payment, shop payout, and physical return.
- Record return and confirm that custody ended.
Skip the tasks for services your shop does not offer. Talk through anything you are unsure about with your trainer and make time to practice it together.
When to Ask for Help
Section titled “When to Ask for Help”For a wrong vehicle, missing approval, failed upload, conflicting custody, or unavailable return action, keep the evidence and contact the Service Writer or Vendor Admin. Include the visible order reference, current stage, action attempted, exact error, and time. Never repeat a payment or handoff merely because a confirmation was slow. See Solve Common Problems.
When a Customer Uses Roger
Section titled “When a Customer Uses Roger”Some DSPs report vehicle problems through Roger in Slack. Your shop still reviews the incoming request in Nova Fora and decides whether to accept the work. You do not need to configure the DSP’s Slack connection. See Roger and Slack.