Vendor Onboarding Guide
Welcome to Nova Fora. Let’s get your shop ready to receive work, keep customers updated, and record vehicle pickups and returns.
The person setting up the shop should know its services and staff and be able to arrange signing of the service agreement. If you’re joining a shop that’s already set up, accept your invitation and start with New Vendor Training.
Before You Start
Section titled “Before You Start”Have your shop’s address, phone number, time zone, working hours, and main contact ready. Gather staff names and email addresses, workshop and team names, and a list of the repair services you offer.
Think about what a driver needs to know on arrival: where to park, where to leave keys, and who to call. Keep passwords, door codes, alarm details, and bank information out of general shop notes.
Set Up Your Shop
Section titled “Set Up Your Shop”Open your invitation and follow the setup pages. The steps can vary with your services; a body-only shop may not need mechanical teams.
Add shop details
Section titled “Add shop details”Check the shop name, contact, phone number, address, and time zone. Correct anything missing or outdated, then choose Save profile to continue to repair services.
If a DSP invited your body shop
Section titled “If a DSP invited your body shop”Your setup is already tied to that fleet and Body Repair. Follow the pages provided; you may not be asked to select repair types or create mechanical teams. Check the name, address, and phone number supplied with the invitation and correct anything outdated. Complete the agreements and any required payout setup before relying on the shop as ready for normal work.
Set your pickup distance
Section titled “Set your pickup distance”If setup asks How far will you travel for a pickup?, choose a realistic distance for your shop. The shop address and distance help match network work to Stations. A personal body shop invited by a DSP serves that fleet’s Stations and is not asked to choose this network pickup distance. Review your operating settings if your address or coverage changes.
Choose repair services
Section titled “Choose repair services”Select the services your shop can perform and choose how you’ll track repair progress. Then choose Save repairs. These choices help determine the work your shop receives, so only select services you actually offer.
Invite your staff
Section titled “Invite your staff”Enter each person’s name and email address, choose Service Writer or Technician as appropriate, and send the invitations. Review the result for each person in case an address needs correcting.
Service Writers coordinate jobs and customer communication. Technicians record their assigned work. You can learn more about responsibilities in the Vendor User Manual.
Create teams
Section titled “Create teams”If the setup asks for teams, check the workshop, enter a team name, and add the location and inspection type where requested. Add someone who has accepted their invitation, or choose Assign later. Select Create team and repeat for your other teams.
Use names your staff already recognize so it’s easy to assign work to the right people.
Choose alerts
Section titled “Choose alerts”Choose the updates and delivery channels you want, then save. To receive text messages, verify your phone and select the SMS topics you need. These are two separate steps.
Sign the agreement
Section titled “Sign the agreement”Have the authorized signer read or download the service agreement, confirm their authority, enter their full legal name, and choose Sign agreement. Then read the Terms of Service and choose Accept & finish. Your shop workspace will open.
Set up Body Repair payouts
Section titled “Set up Body Repair payouts”If your shop will receive Body Repair payments, have the person responsible for banking open payout setup in the shop settings. They should enter the requested business and bank information and complete the verification steps.
Return to Nova Fora, refresh the payout status, and follow up on anything marked incomplete. Bank information belongs in this dedicated setup, never in repair comments or general instructions.
Configure Daily Shop Work
Section titled “Configure Daily Shop Work”Open Settings and decide what staff must record when taking a vehicle from a customer. Mileage and photos asks for the odometer reading and condition photos. A Full inspection requires a submitted vehicle inspection before the handoff is complete.
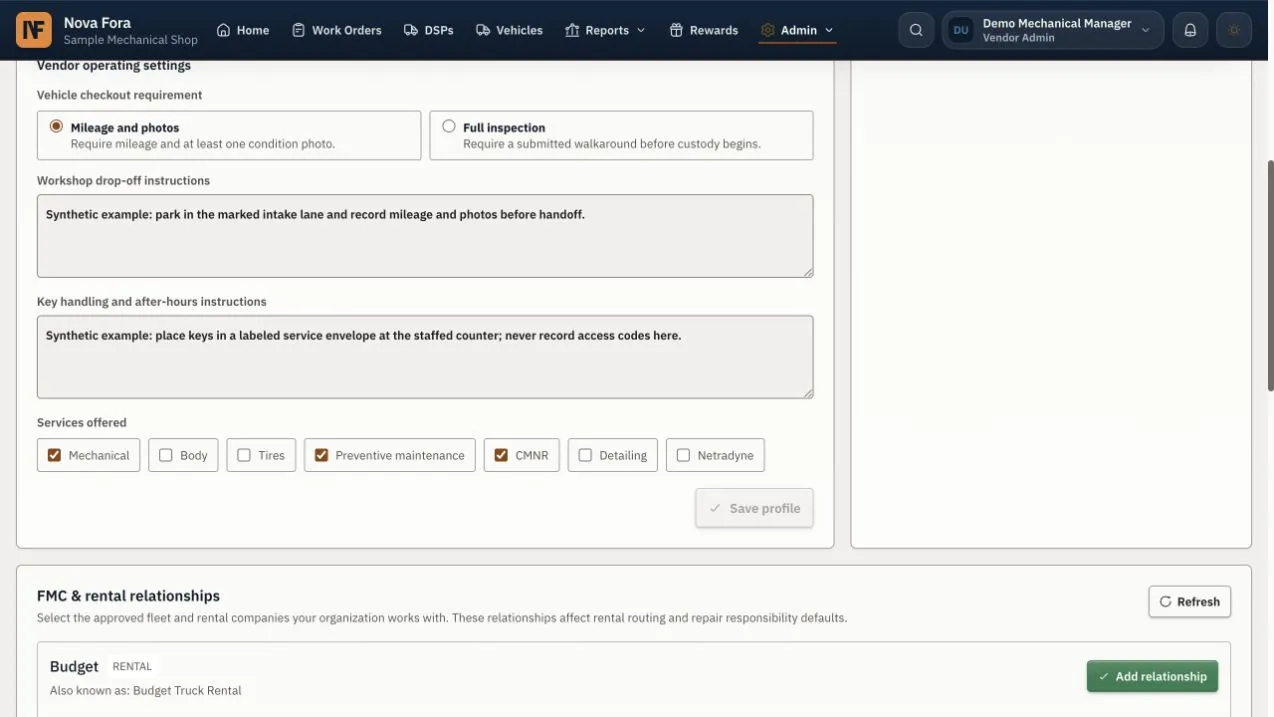
This is the settings page you’ll use after setup. Choose the handoff requirements that match your shop’s process.
Add clear parking, key, and after-hours instructions. Check your services, workshops, service areas, and staff teams, and set realistic goals for accepting, scheduling, and finishing work.
Choose the Right Work Area
Section titled “Choose the Right Work Area”Open Work Orders for mechanical repairs, tires, and routine service. Open Body Repair for damage repairs. Your menu depends on the services your shop offers.
For a new mechanical request, read the vehicle and customer details, the reported problem, photos, and notes before deciding whether to accept it.
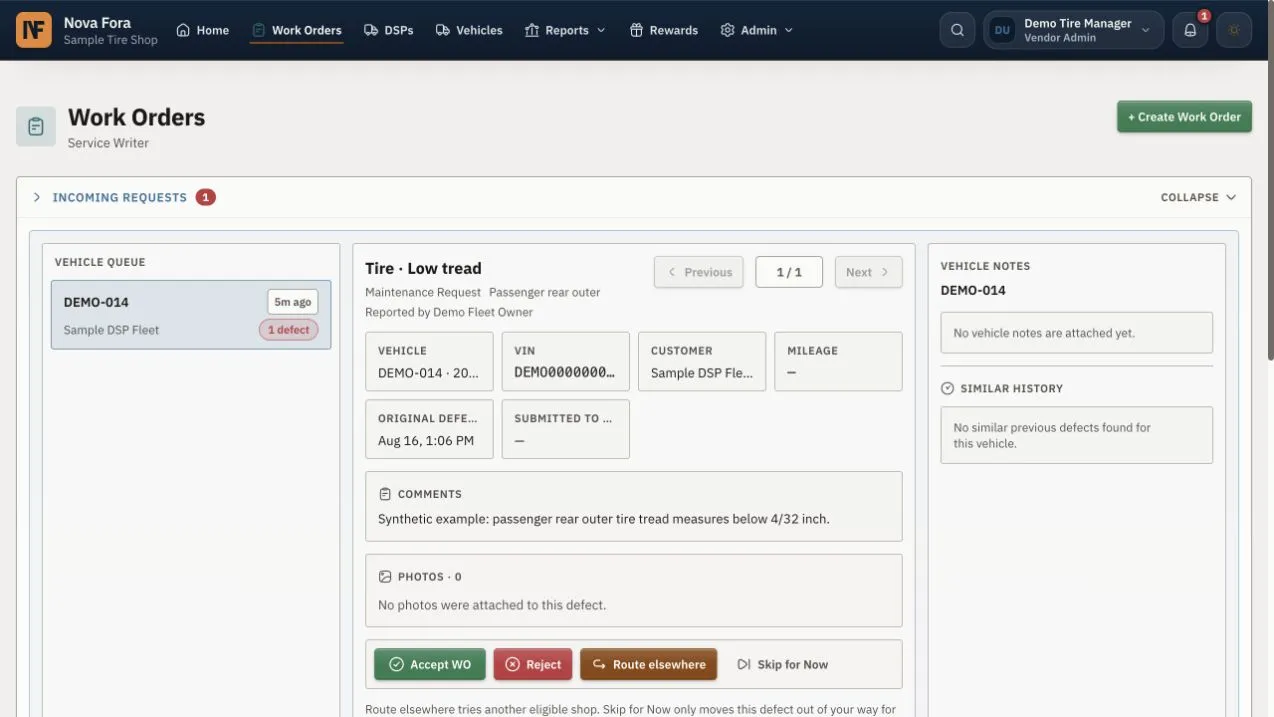
Select a vehicle on the left to read the request. Choose Accept WO only when your shop can take the job.
For Body Repair, start by reading the requested work and photos. Then prepare the quote, including repair items, charges, and a realistic duration. The shop may show In Repair where the customer sees In Shop; both refer to the same stage.
Train Your Team
Section titled “Train Your Team”Use New Vendor Training to walk through your first job with a Service Writer or Vendor Admin. It includes examples for accepting work, preparing a quote, recording pickup, and returning a vehicle.
First Week Routine
Section titled “First Week Routine”Start each day in the correct workshop. Review new requests, scheduled visits, pickups, and jobs waiting for a reply. Give each job a person responsible for the next step.
When you accept work, add the shop job number if you use one, assign the person or team, and schedule the visit. Leave a short note if the next person needs context. At the end of the shift, tell the next team which vehicles are with you and what is still waiting.
Launch Checklist
Section titled “Launch Checklist”Before your first customer job, check these together:
- Can your staff sign in and find their work?
- Do the shop details, services, workshops, and teams match how you operate?
- Could a new driver follow your parking and key instructions?
- Does everyone know what to record at pickup and return?
- Are the agreements complete, along with payout setup if you receive Body Repair funds?
- Does each person know who to ask about approvals or payments?
Practice using sample records in a training workspace. On real customer jobs, ask a teammate to explain the next step without submitting changes just for practice.
Get Help
Section titled “Get Help”If a button is unavailable, check for missing information, the selected workshop, and the job’s current status. If you’re still stuck, ask your Vendor Admin or Nova Fora support. Include the vehicle or order reference, what you were trying to do, and the message shown on screen.